
If you want to grow a bigger following, attract more paying clients and grow your nutrition business then running a challenge is the perfect strategy.
Think about it. When your ideal client is struggling with a nutrition-related problem - whether that is managing GI symptoms, finding the time to meal prep, or eating too much sugar - challenging them to make a small, approachable change with the support and guidance from an experienced nutrition expert (you) would be incredibly appealing.
But the thought of hosting your very own nutrition challenge might seem daunting, right? You are probably wondering, “How long should the challenge be?”, “How do I create the content?”, “How do I keep participants engaged?”.
This guide will answer all of those questions and more. By the end of this article, you will know how to plan, create, run and convert clients from a successful nutrition challenge.
Step 1: Decide whether your challenge will be free or paid.
Whether you choose to run a free challenge or a paid challenge will depend on where you are at in your business along with your business goals.
Running a free challenge.
A free challenge is great for nutrition professionals who are just getting their businesses started.
When you are at the beginning, you likely haven’t built an audience or the trust that people require before they commit to paying for your services. Hosting a free challenge is a great way to start building your audience and giving potential clients a sense of what it is like to work with you.
Hosting a free challenge is also great for nutrition professionals who are looking to build their email lists. When the challenge is free, it is likely that more people will register, allowing you to build a larger list of leads than you might with a paid challenge.
The obvious downside of running a free challenge is that, well, it is free. In other words, it won’t earn you any additional income. With this being said, it is a strategic long-term play. While there may be no financial gain immediately, a free challenge will pay off big time down the road if you run it well.
Running a paid challenge.
A paid challenge is great for nutrition professionals who have an established business, an existing clientele, and an audience who already knows, likes, and trusts them. When you have an audience who trusts you, they will be much more willing to pay to participate in your challenge.
A paid challenge will help you earn additional income but because there is a price tag, there may be more friction when it comes to getting participants to register compared to a free challenge.
Typically a challenge has a much lower price point than your traditional nutrition programs. You want to choose a price point that covers your time and expenses, but also keeps the challenge accessible. We’ve seen paid challenges priced anywhere from $20 to $99 based on the length of the challenge and the level of support offered.
Take action: Consider your business goals and where you are at in your business. Then decide whether your challenge will be free or paid.
Step 2: Determine what the challenge will be.
Now that you know whether your challenge will be free or paid, it is time to consider what that challenge will be, and how long it should last.
This is arguably the most important step. The challenge needs to capture the interest of your ideal clients and deliver a quick win that will leave participants feeling accomplished.
People will not feel compelled to join a challenge that doesn’t have an obvious benefit to them. So ensure your challenge will help clients achieve a goal they actually care about.
For example, a nutritionist who focuses on gut health knows that her ideal clients long for less bloating, gas, abdominal pain, and constipation. In this case, they could run a challenge focused on improving digestion.
A dietitian who focuses on pediatric and family nutrition might know that her ideal clients really struggle to get simple, healthy dinners on the table that everyone in the family will eat. In this case, they could host a challenge focused on one pan meals the whole family will love.

Take action: Determine what the challenge is and clearly identify the quick win(s) it will deliver to the participants.
Step 3: Decide how long the challenge will last and when it will take place.
The length of your challenge will depend on how long you believe it will take participants to achieve the end goal, but also whether your challenge is free or paid.
If you’ve opted to host a free challenge, we recommend that the challenge lasts 5 to 7 days and focuses on a simple but meaningful goal that can be achieved within this shorter timeframe.
If you are hosting a paid challenge, it may last anywhere from two to four weeks and be focused on multiple goals or quick wins.
Once you know how long the challenge will last, you can choose a start and end date. We recommend running a live challenge with a planned start and end date versus an automated challenge that often has lower engagement.
We also recommend starting the challenge on a Monday. Use the weekend prior to the challenge to communicate with your participants and encourage them to prep so they can hit the ground running on day one.
Take action: Determine how long the challenge should last and on what day it will start and end.
Step 4: Create the content for your challenge and a daily challenge schedule.
When it comes to creating the content for your challenge, you should ask yourself, “What will my participants need to successfully complete this challenge?”
For a nutrition-related challenge, one of the most powerful pieces of content you can provide your participants is a meal plan. A meal plan will make your participants' lives much easier by removing the inevitable question “What do I eat?”.
The thought of creating a meal plan, putting together recipes, and writing a shopping list might seem like a lot of work, but That Clean Life can help you do it in minutes.
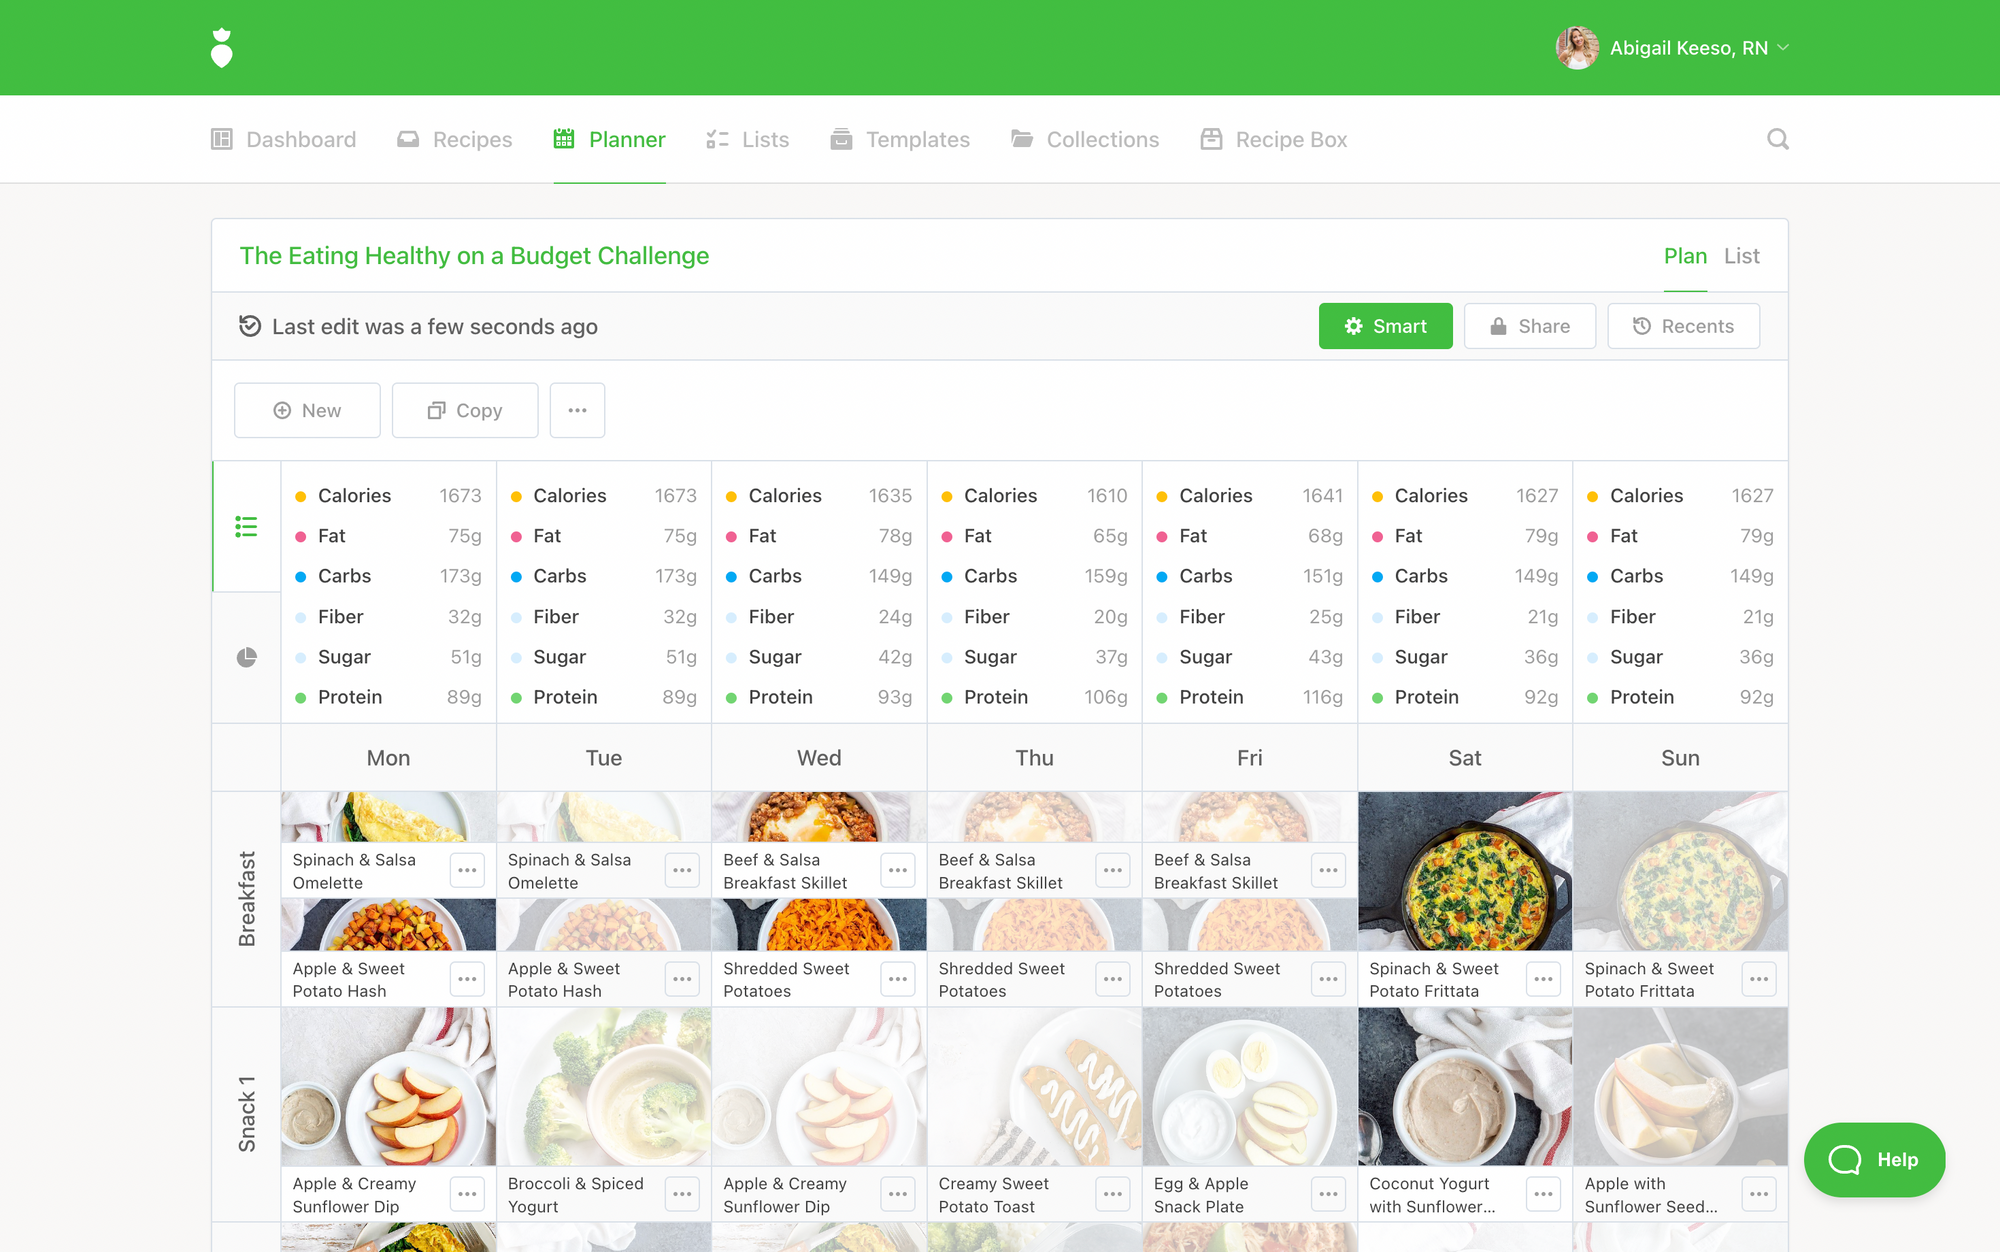
Using That Clean Life you can quickly create a custom meal plan for your challenge or use one of our done-for-you templates. Each template comes with a meal plan, shopping list, recipes, evidence and a prep guide to keep participants organized and on track.
See a full list of That Clean Life's done-for-you templates here.
If a meal plan doesn’t seem like the right type of content for your challenge, consider providing participants with a recipe collection. A recipe collection will allow your participants to pick and choose their meals from a list you have curated.
For example, if you are running a “15-Minute Meals Challenge for Busy Moms”, you could use That Clean Life to put together a collection of 15-minute meals.
In addition to a meal plan or recipe collection, consider what other materials you might provide to your participants to help them be successful with the challenge:
- A food swap list to help them modify the meals you provide.
- Check-ins.
- Coaching calls.
- Lessons.
- Tips.
You may feel the urge to provide your participants with a ton of content and information, but less is more. Too much information can be overwhelming and overwhelmed participants are likely to give up, which obviously isn't what you want. Provide your clients with just enough content to help them achieve the goal and ensure it is easy for them to navigate and understand.
Once you know what content you will provide to your participants, outline a daily schedule for your challenge, so you have an idea of how you will keep participants engaged on a daily basis. This may include drafting engagement questions, scheduling live calls, or planning daily tips.
Take action: Create a meal plan or recipe collection for your challenge along with any other supporting materials including a daily challenge schedule.
Step 5: Decide whether you will offer a community component with your challenge.
One way to take your challenge to the next level is to offer a community component or a dedicated place for participants to connect with you and each other.
Many Electronic Health Records (EHRs) or client management software options include group chat features. Learn more about launching a New Year Nutrition Program with Practice Better and offering a built-in support system here.
If you choose not to offer a community component, you should still consider how you will communicate with participants on an individual basis. In this case, email is a great option.
Take action: Will you offer a community component with your challenge? If so, create that space now.
Step 6: Create a challenge registration page and welcome email.
Now it is time to create a registration page where participants can sign up for your challenge.
Again, consider your EHR. Practice management software options like Practice Better have features that allow you to create a registration page, set up automated welcome emails, and collect payment.
The welcome email series should get participants excited for the challenge and set them up for success. Include instructions on how to access the challenge content, a list of the next steps to prepare for the challenge, a link to join the community (if you are offering one), and an outline of what participants can expect to happen next.
Take action: Create your registration page and set up an automatic welcome email.
Step 7: Announce and market your challenge.
The planning and creation phase is now complete and it is time to let the world know about your challenge!
How you market your challenge will again depend on what stage you are at in your nutrition business and what channels you have available to leverage.
If you are just starting out with your nutrition business and do not have much of an audience built up, consider reaching out to friends and family to invite them to join your challenge. (We all have to start somewhere!) Ensure you strongly communicate the benefit of the challenge. You may also consider posting flyers about your challenge in places where your ideal clients hang out such as gyms, fitness studios, grocery stores, community centers, etc.
If you have an established nutrition business, you can announce and promote your challenge on your social media channels (Facebook, Instagram, LinkedIn), on your blog, and to your email list. To attract an even broader audience, you may consider running social media ads.
We recommend that you start promoting your challenge one to two weeks in advance of the start date. We also recommend that you create a marketing calendar that outlines how you will promote your challenge every day leading up to the start date. Yes, you need to promote your challenge every day! People often need to hear about your challenge multiple times in multiple ways before they register.
While marketing your challenge, don’t forget to stay in touch with participants as they register and join the community. The welcome email will help get them set up for success, but you should also stay in touch with them leading up to the challenge to guide them through the challenge materials, answer questions and help them prepare for the challenge itself.
Take action: Create a marketing plan for your challenge and then put it into action.
Step 8: Run your challenge.
Now for the fun part! Running your challenge.
This is the time you get to step out of marketing mode and into practitioner mode. The hardest work is behind you. Your challenge content is created and you have planned how you will guide clients through the challenge. Now is your time to ensure each and every participant completes the challenge and experiences the quick win.
When running your challenge, be in close contact. Be present for your participants every day throughout the challenge. Answer their questions and help them stay on track to reach the end goal.
Encourage participants to share photos of the meals they are trying, ask questions, and connect with one another. Engagement feeds engagement, so keep encouraging and supporting participants to interact throughout the challenge.
Running the challenge is your chance to give participants a preview of how awesome it is to work with you as a nutrition professional. Give them everything you’ve got and deliver a great experience!
Step 9: Complete the challenge and tell participants what to do next.
At the end of your challenge, you will hopefully have a group of people who are feeling great and have achieved their goals. Many of them will likely be wondering, “What next?”.
Congratulate your participants on their progress and for completing the challenge. Then tell them how they can continue working with you, whether that is through your one-on-one nutrition counseling, an upcoming group program, or something else.
You may even consider offering a special limited-time bonus or incentive to increase conversions such as a customized 7-day meal plan or 20% off the price of your services when they sign up before a certain date. Communicate this offer through your community group and via email to ensure all participants know about it.
The end of your challenge is also a great time to ask participants for testimonials that you can use to market your services or promote future challenges.
Take action: Plan your end of challenge strategy. What will you tell clients to do next, and what will the incenvtive be? How will you communicate this so that all challenge participants are aware?
Step 10: Stay in touch with your challenge participants and continue to grow your business.
As your challenge wraps up, some participants will stay on as paying clients, while others may not.
For those who do not choose to continue working with you after the challenge, be sure to stay in touch with them. Continue to nourish those relationships so that you are top of mind when they are ready to work with you again. Having a weekly or monthly newsletter is a great way to stay connected.
Now you can see how simple it can be to host a challenge that grows your nutrition business. A well-planned challenge has the power to help you grow your list, serve your community, build trust and get participants results. Follow these ten simple steps to run your next challenge and watch your clients and business soar.
